Showing posts with label Silent Movie. Show all posts

Sunday, 8 January 2012

Silent Movie 5


---

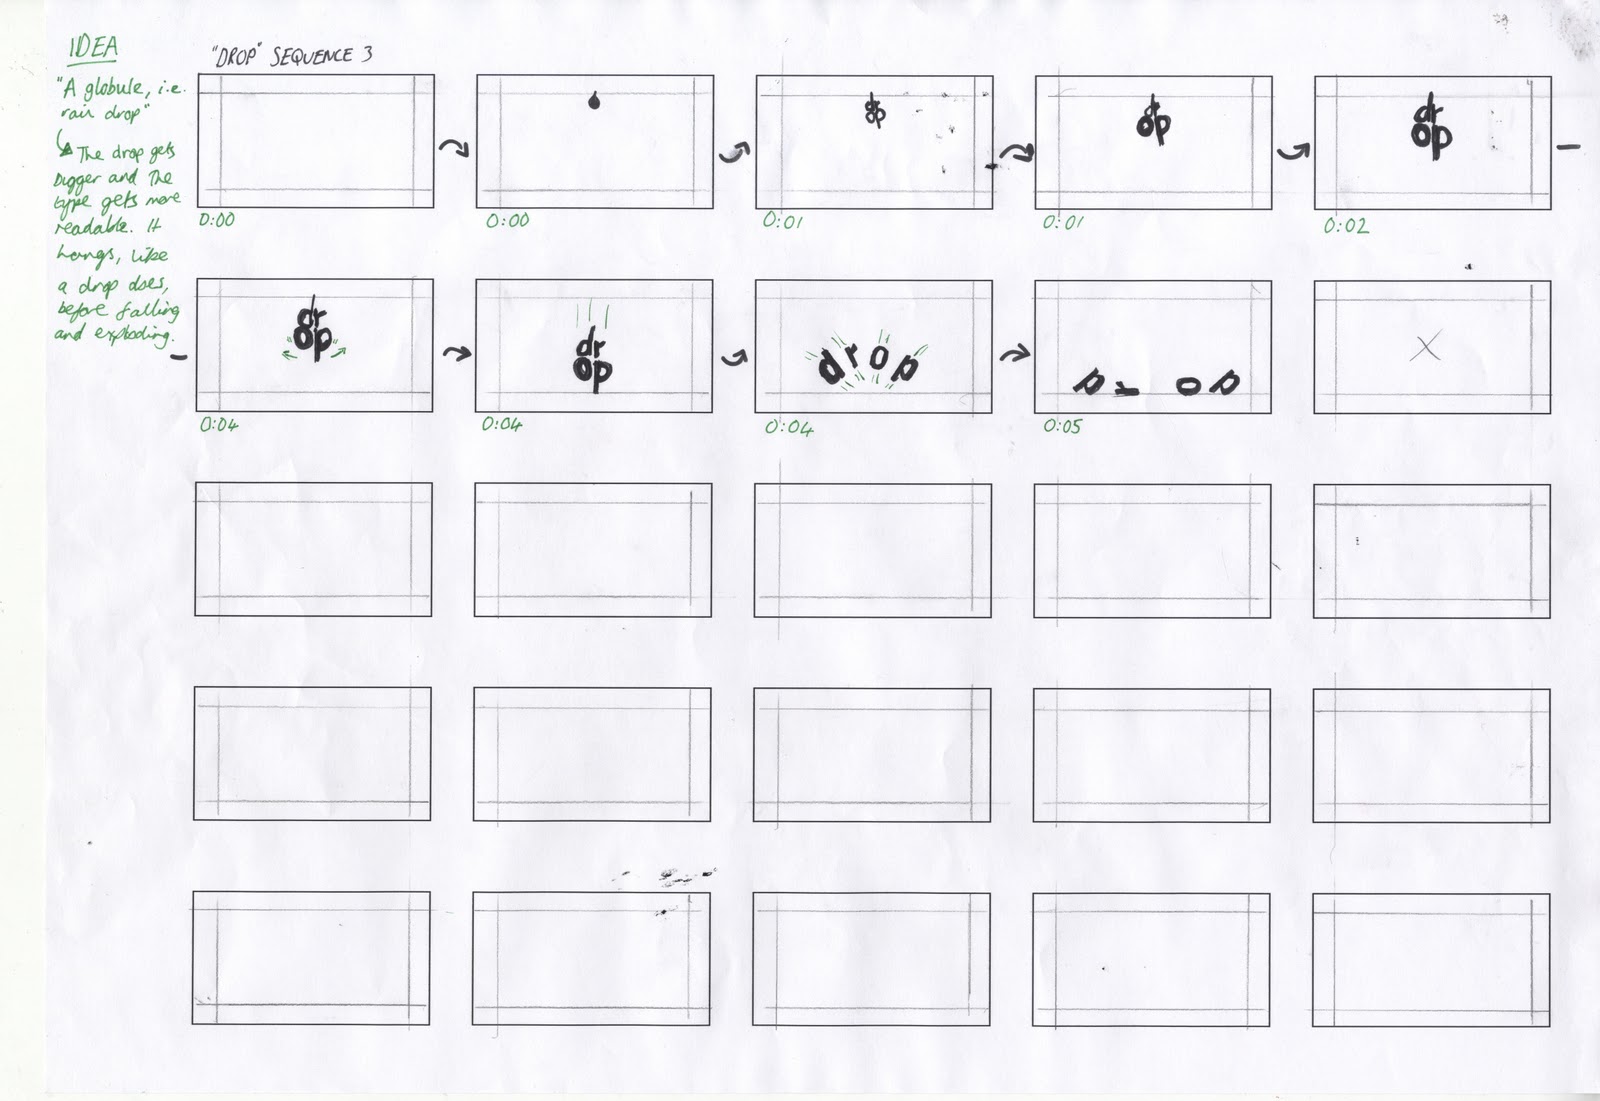
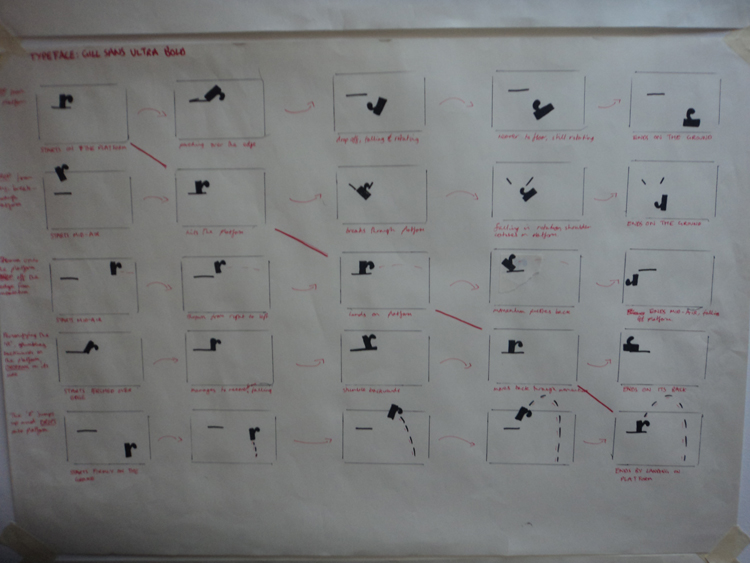
I started by shaping the word 'drop' into a droplet shape in Illustrator, and imported the file into AfterEffects.  I placed the anchor point at the bottom of the image, and reduced the scale when it the bottom of the frame - giving it a squashed effect.  I then introduced 4 separate letterforms and animated them accordingly, taking advantage of the graph editor to give a smooth outcome.


Silent Movie 4


---

This one is the most different to my storyboards, in the sense that they drop off without flopping over.  I think I tested my ability to interact with the letterforms the most in this one - pushing one over with the other, for example.

Silent Movie 3


---

For this one, I used the 3D effect to create the illusion that each letterform is coming from behind the viewer, followed by an increase in scale for the whole composition to give a zoomed in effect.

Silent Movie 2


---

To achieve the decrease in weight, I created a text layer and had to individually keyframe each frame to get a smooth transition.  The information i's were constructed in a composition and nested.

Silent Movie 1


---

I separated each letter into an illustrator layer, then imported it into After Effects.  This allowed me to adjust each one individually, which is how I achieved the varied movement and scale.

Sunday, 11 December 2011

Applying a Timeline to my Storyboards


In response to the timeline workshop, I constructed 5 separate timelines, 5 seconds on each, and placed my current storyboards on there.  To save time, and to make it easy to move frames around, I scanned in my work, printed it out and cut them out with blu-tac on the underside.


Because I am using the blu-tac stick and move method, I am able to remove frames off my storyboards to investigate whether or not they are still understandable.  I reverted back to the 5 keyframe format, and found that they still made sense.  It was still beneficial to have the other frames there to understand them, but it shows that my frames are concise and easy to follow - the green pen can demonstrate motion and reduce numerous frames, to the one.


Friday, 9 December 2011

Feedback From the First Crit


Overall, the feedback I got from Yafet and Ben were good.  Both of them recognised what was going on and didn't have much trouble understanding the concept of speed with my timestamps.  I covered up the annotations at the side for the purposes of the crit.

Considerations
Disperse 1:  Colour to the 'r' could give emphasis before exploding into the screen.
Drop 1:  It could read better in the end, as in falling in the correct order.
Drop 2:  They could drop out of the frame as they keel over, giving another relation to my theme.
Drop 3: The stem of the 'd' could stretch before it drops, and the letters could fall out of the frame.

Annotating Ideas - Introducing Timing


To get a better understanding of what is going on, I annotated my sheets in a different colour.  This included a brief explanation at the start of the storyboards, and timestamps to suggest the speed of the animation.  When it comes to applying these digitally in Aftereffects, it will also make my job a lot easier.

I also added some movement marks where it is necessary, for example on the 'drop' that sways side to side.  It just allows the viewer of my storyboards to paint an accurate picture in their mind of what I want to communicate.


---

Developing our Strongest Ideas


I came up with a quick technique to make storyboarding my ideas quicker and more accurate.  By tracing the previous frame on a separate piece of paper, it allowed me to map out the next one by placing other aspects of the frame around existing ones.  For example, here I could copy the last frame directly and extend the pool around the lettering.

Also, for this exercise, Lorraine allowed us to use as many frames as we needed to, which freed up the 5-frame restrictions we had before.  It just allowed me to add extra details that portray my idea more accurately.


Tuesday, 6 December 2011

Developing an Idea: Working with Words


Idea 1: A drop of water, using water within the design.  Inspired from the definitions "a globule, i.e. rain drop" and "a fall in globules".

---


Idea 2: A drop in confidence, from high to low.  Inspired from the definition "abandon; ignore" and "reduce or hurt".

---


Idea 3: Dropping from a height, usually breaking the word.  Inspired from the definitions "let go of, or fall" and "fall apart or break down".

---


Idea 4: The dispersing of information or ideas.  Inspired from the definitions "to spread, or to broadcast information" and "to distribute".

---


Idea 5: To disperse in different directions, scattering about.  Inspired from the definitions "to drive off or scatter in different directions" and "break up, disband".

---

Monday, 5 December 2011

Analysing Initial Storyboards


3 sheets, 15 sequences, 5 frames each.  Every one reflecting on 5 seconds worth of footage.  Our first workshop in motion, and we had restrictions on each:
Sheet 1: Couldn't move the letterform, only allowed to adjust scale and weight.
Sheet 2: Could only move and rotate around the frame, one frame being identical in each - diagonal along each sequence (demonstrated with red pen)
Sheet 3: Again, the same frames had to be identical, but this was focusing on moving in and out of the frame - creating a 3D effect.

Difficult, but rewarding.  The workshop broadened my mind and introduced me to thinking 4D.  Storyboarding also forces me to improve my drawing skills, something that will be incredibly useful in my practice.