
Keyframe Interpolation: The method in what a keyframe is set to be animated from one to the next.
Using Illustrator Paths
INTERPOLATION METHODS
AE applies Besier Curves as the default.
Altering position on the timeline to create another keyframe. Added another point on the path, and dragged down to get the default Besier Curve around the frame. The Convert Vertex tool takes away the curve to get a harsh corner.
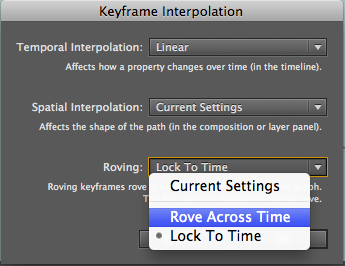
Another way is to select a keyframe, and change the Spatial Interpolation to 'Besier' or 'Linear' in the Keyframe Interpolation option . It is possible to select all keyframes at once to alter them together.
Animation > Keyframe Interpolation alt⌘K
On a motion path, each dot is one frame. Therefore, fewer dots mean faster motion, more dots slower motion. A holding keyframe keeps the keyframe held in a fixed position until the next keyframe, essentially stopping tweening. The icon on the timeline changes from a diamond to a 5 sided shaped that looks like a house on its side.


---
Imported blink.ai as a Footage file, meaning flat layer. Dragged it into the composition window.
Utilised the 'Hold Keyframe' to give the illusion that the animation is blinking. Did this by adjusting the Opacity Layer (T) from 0% to 100% through different keyframes.
Animation > Toggle Hold Keyframe


Roving means to move. You can specify Rove to Time to allow it to move at a constant speed over the timeline.


---
It is possible to create a shape in illustrator to be used as a motion path in AE. Once the shape is made, simply copy, put a starting keyframe on the shape in AE, and paste to make a motion path. Keyframes are automatically roving across time.
To flip the motion path, for it to move the other direction, select the keyframes and select he 'Time-Reverse Keyframes option in the Animation list. My path originally played clockwise, and now plays anti-clockwise with this option.
Animation > Keyframe Assistant > Time-Reverse Keyframes


Layer > Transform > Auto Orient alt⌘K


Masks
'Make Comp Size' automatically sets the solid shape to fill the entire frame.
Masks determines whether a layer is transparent or opaque. They are essentially a vector shape.
---
A comp size solid that is pasted onto makes four different masks.
'M' is the shortcut to select all the mask positions. Double tapping opens all the parameters.
Masking text from illustrator allows for it to be edited in AE.
Toggle Switch/Modes at the bottom left of the interface opens another set of options in the layer menu.
Alpha Matte will use the illustrator file's shape for a filling template for the backdrop. Luma brings out the brighter areas and inverted fills the background and leaves out the foreground image.
---
Clouds


