
Additional KeyframesPressing 'U' opens all animated properties of the composition. At the moment, all squares move across the screen from left to right at a constant. To apply acceleration and deceleration, the keyframes have to be eased in and out.
Simplifying composition
Grouping
Adding sound
To do this, go to Animation > Keyframe Assistant, and select either ease in for acceleration, and out for deceleration. If the object has to be eased in and out, the 'easy ease' option will apply both. Below is a demonstration; the green square is eased out, blue eased in and the grey eased in and out. The red stays at a constant speed for comparison purposes:


---
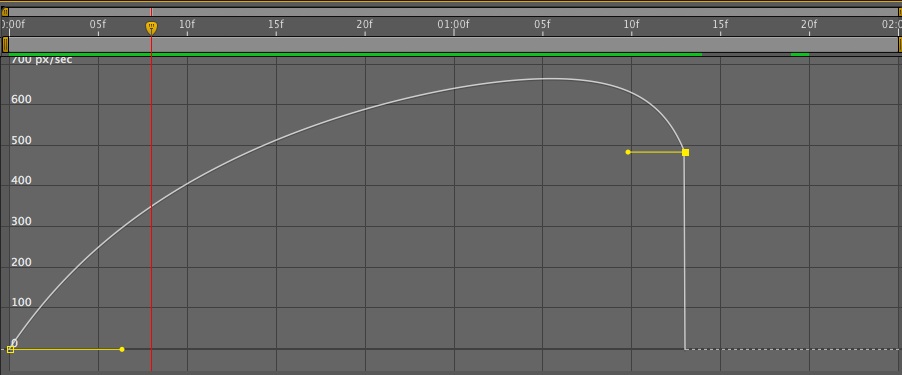
THE GRAPH EDITOR
On the toolbar at the top of the layers menu, there is a 'Graph Editor'. This demonstrates acceleration and deceleration in more depth, and allows custom changes to be made:

(constant speed)
(acceleration)

(constant speed)


---
SWINGING THE PENDULUM
Using the ease in and ease out technique, we had an exercise to emulate a swinging pendulum. We brought the black layer into the composition, and doble clicked the eclipse tool to add a mask to the solid. By pressing 'Y' it is possible to adjust the anchor point, ready for rotation.
By adding three keyframes, rotated -80, 80 then -80 again it will rotate the shape around the anchor point at a constant speed. Going to the graph editor and selecting the speed graph will allow the customisation of the ease in and out technique. Once tweaked, there is a shape that will accelerate to 0 degrees, and decelerate on 80 and -80. Demonstration below:


---
ESTABLISHING PARENT CHILD RELATIONSHIPS
When there is a parent child relationship, the child can move individually, but it is always bound to the parent layer. All properties apart from the opacity layer.
When creating a path for the layer, 'Auto-Orient' allows the object to move with the curves. The 'rove over time' option disregards that keyframe in the timing, making it easier to create flowing movement.


---
---
Another way to group objects together is to make a whole composition, simplifying the timeline of the key project. Layer > Pre-compose does this.

---
.aiff or .wav are the best audio files to use within AfterEffects. MP3s can be exported in Quicktime 7.

When exporting to .mov in AfterEffects, make sure the 'Audio Output' box is ticked.
No comments:
Post a Comment